
Fine hair can look freshly washed for all of ten minutes, then settle into a smooth but limp sheet as it dries. The trick when you air-dry fine hair is to control water, product weight and root position before gravity takes over. You are not trying to make fine strands feel heavy or overly styled; you are building lift while the hair is still flexible.
The most reliable routine is simple: wash clean, remove enough water, apply less product than you think, set the roots away from the scalp, then leave the lengths alone until they are fully dry.
At a glance
- Fine hair usually dries flat because wet roots are heavy and products sit too close to the scalp.
- Volume starts before drying, not after it has collapsed.
- A microfibre towel or soft cotton T-shirt helps remove water without roughing up the cuticle.
- Root clips, a temporary parting switch and minimal product make the biggest difference.
- Fine straight hair needs lift and separation; fine wavy or curly hair also needs gentle hold so shape does not fall out.
Why fine hair goes flat as it dries
Fine hair has a smaller strand diameter, so it is easily weighed down by water, conditioner, leave-in products and natural oils. When the roots dry in their normal position, they create a memory of lying close to the scalp. Once that shape sets, brushing or fluffing can add temporary airiness, but it often collapses again.
Another issue is product placement. A lovely smoothing cream on medium or coarse hair can make fine hair look cleaner at the ends but oily at the crown. Even a lightweight formula can flatten the top if it is applied too near the roots or used on hair that is still dripping wet.
Porosity matters too. Low porosity fine hair can reject product and look coated quickly, while high porosity fine hair may drink up water then dry frizzy or uneven. If you are unsure where your hair sits, this guide to high and low porosity hair explains why the same routine can behave very differently from one head of fine hair to another.
Step 1: make the wash lighter at the roots
Flat air-dried hair often starts with over-conditioned roots. Shampoo the scalp properly, not just the lengths, and rinse until the hair feels clean rather than silky-coated. If you use conditioner, keep it mainly from the mid-lengths down unless your scalp area genuinely feels dry.
For fine hair that gets greasy quickly, a very rich mask before every air-dry can be too much. Save heavier treatments for the ends, or use them on days when you plan to tie hair back. If your hair feels lank by the evening of wash day, the routine is probably too conditioning at the crown.
Step 2: remove water without crushing the shape
Hair that is dripping wet is too heavy to build lasting volume. After rinsing, gently squeeze the lengths with your hands, then blot with a microfibre towel or soft cotton T-shirt. Avoid rubbing the hair back and forth, because that can create frizz while still leaving the roots damp and flat.
A towel wrap can help, but do not twist it tightly at the crown. For fine hair, a long, heavy towel turban can press roots into the scalp. Five to ten minutes is usually enough to take out excess water before styling. If you plop wavy or curly fine hair, keep the wrap loose and watch that it is enhancing shape rather than squashing lift. For technique ideas, the microfibre towel plopping review is useful if your air-dry routine includes waves or curls.
Step 3: use one lightweight styler, not a full cocktail
To air-dry fine hair with volume, choose one main styling product and apply it with restraint. A mousse, foam or light volumising spray usually suits flat-prone roots better than a heavy cream. If your ends frizz easily, use the smallest amount of leave-in only on the final few centimetres, then keep your root product separate.
For fine straight hair
Focus on root lift and soft separation. Apply a small amount of volumising product to the crown and around the front hairline, then comb through lightly with fingers or a wide-tooth comb. Avoid coating the full length unless your hair needs hold, because straight fine hair shows product build-up quickly.
For fine wavy hair
Scrunch a lightweight foam or gel into the mid-lengths and ends while the hair is damp, not soaking. Tip your head slightly to each side as you scrunch so the roots are not pulled straight down. If waves dry stringy, you may be using too much product or not enough water removal before application.
For fine curly hair
Fine curls need hold, but heavy curl creams can stretch them. Try applying a light leave-in to the ends only, then add a small amount of gel or foam through the curl sections. Lift the roots with clips while drying so the curl pattern does not set flat at the scalp.
Step 4: set the roots before they dry
This is the step most people skip. Once the roots dry flat, the rest of the routine has to work harder. After applying product, create lift while the hair is still damp.
- Switch your parting temporarily: if you normally part on the left, flip hair to the right while it dries, then move it back once dry for instant lift.
- Clip upwards at the crown: place small, lightweight clips at the root so the hair dries lifted rather than plastered to the scalp.
- Lift the fringe area: pinch the front pieces upwards or clip them back loosely to stop them drying flat against the forehead.
- Avoid tight behind-the-ear tucking: it can create dents and flatten the sides before the hair has set.
If you have layers, lift the shortest layers first. They dry quickly and usually decide whether the finished result looks airy or limp.
Step 5: shape the lengths without over-handling
Fine hair can lose volume if it is touched too much while drying. Once the roots are clipped or positioned, shape the lengths and then leave them alone.
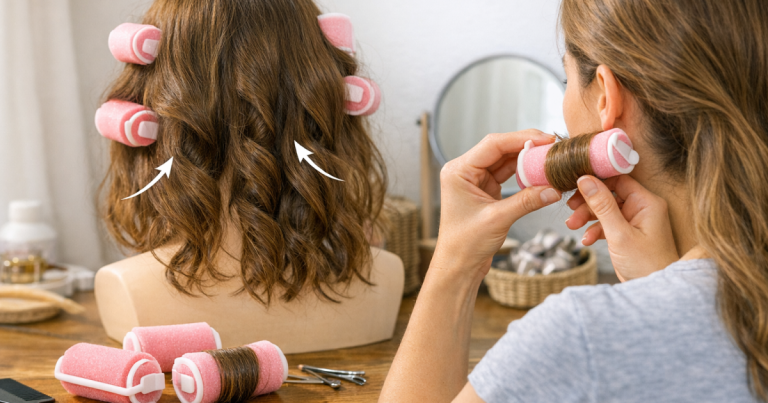
- For soft bends: twist two to four loose sections away from the face, then release them once dry.
- For waves: scrunch upwards with your palms, then stop before the hair starts to feel fuzzy.
- For smoother ends: comb only the bottom section into place and avoid dragging the comb from the roots.
- For more face-framing movement: tuck front pieces around a soft roller or loose satin heatless curling rod while the rest dries naturally.
The aim is not to force a curl pattern that your hair cannot hold. It is to stop the lengths drying as one flat sheet. If your fine hair struggles to keep any bend at all, the prep principles in this fine-hair heatless curl routine are a helpful next step.
Step 6: let it dry fully before fluffing
Fine hair can look nearly dry while the roots are still damp. If you remove clips or shake everything out too soon, the crown can collapse. Wait until the scalp area feels completely dry, then remove clips gently and massage the roots with fingertips.
Use dry hands. Oils, moisturiser and leftover styling product on your palms can transfer straight onto fine hair and make it look greasy. For extra lift, tip your head forward briefly, loosen the roots, then stand upright and let the hair fall naturally. Avoid brushing through waves or curls unless you want a softer, looser finish.
Flat-hair troubleshooting checks
If the roots look greasy
You may be applying product too close to the scalp, using a conditioner that is too rich, or leaving too much water in the root area before styling. Next wash day, use less conditioner near the crown and blot more thoroughly before product.
If the ends look fluffy but the top is flat
The roots need lift earlier, while the ends need gentler handling. Clip the roots first, then scrunch or twist the lengths. Do not keep brushing through the top to fix the ends, as this usually removes volume.
If waves fall out as they dry
Your hair may need more hold but less weight. Swap cream-heavy styling for a light foam or gel, and apply it after blotting rather than on dripping hair. Fine waves often need structure without slipperiness.
If hair dries with dents
Check how you are holding it while it dries. Tight towel wraps, firm clips, elastic bands and repeated tucking behind the ears can all leave marks. Use loose placement and move clips slightly if one area is drying with a crease.
A simple routine to repeat
- Wash the scalp thoroughly and condition mostly from the mid-lengths down.
- Squeeze out water, then blot with microfibre or a soft cotton T-shirt.
- Apply one lightweight styler, keeping heavy products away from the roots.
- Set the roots upwards with clips or a temporary parting switch.
- Shape the lengths with gentle twists, scrunching or loose rollers.
- Do not touch until fully dry, then fluff only at the roots.
This routine works because it respects what fine hair needs most: less weight, earlier lift and enough hold to stop the shape dropping before it sets.
Helpful questions
Should fine hair be air-dried or blow-dried for more volume?
Blow-drying can create faster lift, but air-drying can still look full if the roots are clipped up and the product is light. The key difference is that air-drying needs more patience before you touch the hair.
Can I air-dry fine hair overnight?
You can, but going to bed with very wet fine hair often flattens the roots. Blot it well first, keep roots lifted where possible, and avoid sleeping with the crown pressed tightly into a towel or bonnet.
Why does my fine hair look good damp but flat when dry?
Water temporarily clumps and lifts the hair, but as it evaporates the roots settle. Root clipping and a small amount of hold help preserve the shape once the hair is dry.
Do I need dry shampoo after air-drying?
Not always. If the roots are clean but too soft, a little dry shampoo or texture spray can add grip. If the hair already looks coated, adding more product may make it flatter.
What to remember
Fine hair does not need a complicated air-dry routine; it needs a lighter one done in the right order. Remove excess water, keep product selective, lift the roots before they set and leave the lengths alone while they dry. That combination gives fine strands the best chance of looking soft, airy and intentionally styled without relying on heat.