Fine, flat hair can look smooth one minute and collapsed by lunchtime, especially around the crown and parting. Using root crimpers for fine hair is about creating hidden structure underneath the top layer, not adding visible crimped texture through the lengths.
The trick is restraint: small sections, brief contact, and a clean veil of uncrimped hair over the top. Done well, the result looks like natural lift rather than styled-in texture.
The short version
- Use a root crimper only on completely dry hair, after a light heat protectant has settled.
- Leave the visible top layer untouched so it covers the textured support underneath.
- Work in very narrow sections around the crown, not across the whole head.
- Clamp close to the root but not on the scalp, then release without dragging.
- Let the hair cool before brushing, touching or adding finishing spray.
What a root crimper actually does
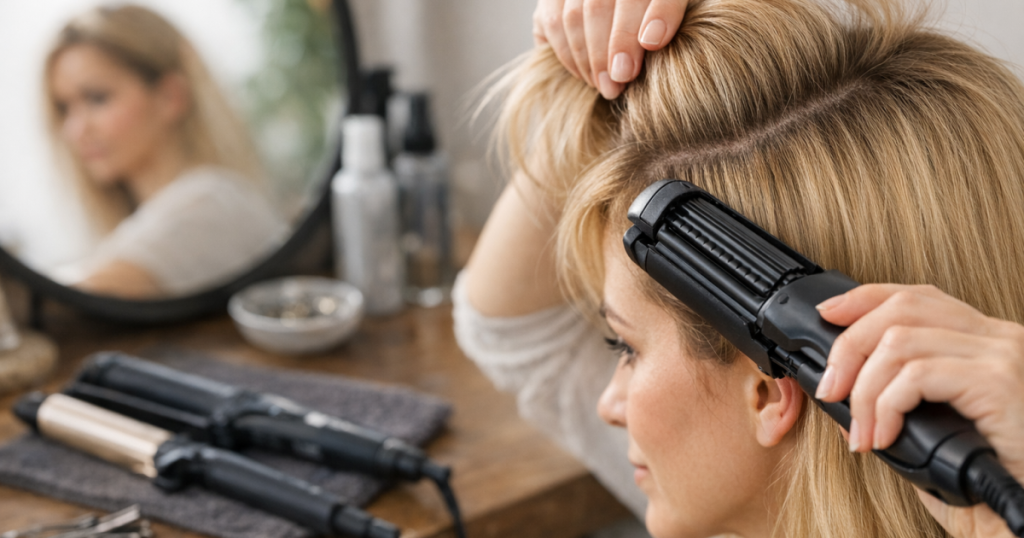
A root crimper uses small textured plates to press a subtle zig-zag pattern into the hair near the scalp. That texture makes the individual strands sit slightly away from each other, which helps the hair above it look fuller.
It is different from full crimping. You are not trying to create a visible style from root to tip. You are making a discreet support layer in the areas that usually fall flat: the crown, the sides of the parting, and sometimes the hair just behind the fringe.
This is why root crimping can be useful on fine hair that refuses to hold volume from blow-drying alone. It can also be less messy than backcombing because the structure is pressed into the root area rather than teased into a knot. However, it is still a heated tool, so the goal is to use the least amount of heat and pressure that gives the lift you need.
Step 1: Prep fine hair so it does not turn limp
Start with hair that feels clean but not overly slippery. Heavy masks, rich oils and creamy leave-ins near the scalp can make fine roots separate or collapse. If your hair is freshly washed, use a lightweight conditioner mainly through the mid-lengths and ends, then dry the roots fully before styling.
Detangle gently before you section. Fine hair can snap if you pull through tangles at speed, and a neat root crimp looks better when the hair lies smoothly over the textured sections. If brushing causes frizz or snagging, the guidance in our Tangle Teezer Original Detangling Brush review for fine or thick hair is a useful next read for matching brush technique to hair density.
Apply a heat protectant lightly and let it dry before you use the tool. Do not clamp damp hair unless the manufacturer specifically says the tool is designed for that use. Fine hair usually needs a more cautious approach than coarse hair, so start low and only increase if the lift disappears immediately. For a broader hair-type breakdown, see how much heat each hair type needs.
Step 2: Choose the right areas to crimp
Root crimpers for fine hair work best when you are selective. If you crimp every section, the hair can look stiff, wide or accidentally retro. Instead, focus on the zones where you want lift and leave the rest natural.
For a flat crown
Lift a horizontal section across the crown and clip the top layer out of the way. Crimp one or two slim sections underneath, then drop the smooth hair back over them. This gives height without a visible pattern.
For a parting that splits
Avoid crimping directly on the parting line. Instead, take small sections just underneath each side of the parting, then let the top layer fall naturally. This helps the hair sit up without making the parting look bulky.
For fine bobs and lobs
Work around the crown and upper sides only. Crimping too low on a shorter cut can make the silhouette look boxy. The aim is root lift, not width through the ends.
For fine wavy hair
Keep the crimping underneath and use your fingers rather than a brush afterwards. Brushing through waves after root crimping can disturb the pattern and create fluffy volume instead of controlled lift.
Step 3: Clamp with a light hand
A compact root tool such as the BaByliss Root Boost is designed for working close to the scalp, but the technique matters more than the product name. Take a narrow section, hold it out from the head, and place the plates around 1–2 cm away from the scalp. You should feel control, not heat on the skin.
Clamp briefly, release, and move on. Do not squeeze repeatedly on the same patch if your first press is not perfect. Fine strands can become dented or dry-looking when they are pressed too many times. If you need more lift, add another hidden section rather than overworking one section.
Keep each section slim enough that the plates can press evenly. Thick sections are more likely to crimp only the outer hairs, leaving the middle untouched and the finish uneven. Fine hair often responds better to two tiny, well-placed crimps than one large, heavy-handed clamp.
Step 4: Let the lift cool before you style over it
Cooling time is where many root-volume styles succeed or fail. After crimping, let the roots sit for a minute before you touch them. Hair is more shapeable while warm, so brushing or pushing it down too quickly can undo the lift you have just created.
Once cool, drop the top layer over the crimped sections. Use your fingertips to place the hair rather than brushing aggressively. If you need polish, smooth only the outer surface with a soft brush or comb, keeping the teeth away from the crimped root layer.
Finish with a light mist of flexible hairspray if your roots fall quickly. Avoid wet, heavy sprays close to the scalp because they can weigh down the very area you have lifted. Dry shampoo can add grip, but use it sparingly; too much powder can make fine hair look dull or separated.
Common mistakes that make root crimping obvious
- Crimping the top layer: Always leave a smooth veil of hair to hide the texture.
- Starting too close to the scalp: This can feel uncomfortable and create a hard ridge. Leave a small gap.
- Using too much product first: Heavy styling creams and oils can turn fine roots flat or greasy-looking.
- Dragging the plates down the hair: A root crimper is for pressing, not gliding like straighteners.
- Crimping the same areas every day: Rotate your placement or use heatless lift methods between heat-styled days.
When a heatless option may be better
A root crimper is useful when you want fast, targeted lift that lasts better than a quick brush-through. It is not always the gentlest option if your hair is very fragile, bleached, breaking at the crown, or already feels dry at the root area.
On low-heat or no-heat days, try Velcro rollers at the crown, root clips while air-drying, or foam rollers placed high enough to lift the base. These methods tend to give a softer, rounder lift rather than the firmer internal scaffolding of a crimper. If your hair is short and loses height easily, our tutorial on using foam rollers on short hair for lift, bend and soft curls shows how to create volume without relying on plates.
The best choice depends on the finish you want. Root crimping gives hidden grip and height. Rollers give bend and softness. Backcombing gives instant fullness but can be rougher to brush out. For fine hair, alternating methods is often kinder than using the same heat tool in the same place every time.
Helpful questions
Can root crimpers make fine hair look thicker?
They can make the root area look fuller by creating hidden texture under the top layer. They do not change hair density, but they can make fine hair sit with more lift.
How often should I use a root crimper?
Use it when you need longer-lasting lift, not automatically every day. If your hair is fragile, rotate with heatless methods and avoid crimping the same sections repeatedly.
Should I crimp before or after curling?
Crimp the roots first, let them cool, then style the lengths. If you curl first, sectioning for the root area can disturb the finished shape.
Will the crimp marks show through fine hair?
They can if the sections are too high, too wide or too close to the parting. Keep the crimped pieces underneath and leave a smooth top layer untouched.
Do root crimpers work on freshly washed hair?
Yes, but freshly washed fine hair can be slippery. A tiny amount of texture spray or dry shampoo at the roots can add grip, but keep product light to avoid collapse.
Final thoughts
Root crimping is most flattering on fine, flat hair when it is used as an invisible support technique. Think small sections, low-to-moderate heat, brief clamps and careful placement under the surface layer.
If you want lift that looks natural rather than obviously styled, resist the temptation to crimp more hair than necessary. A few well-hidden presses at the crown can do more for fine hair than a full head of texture, especially when you pair the tool with light prep and sensible heat habits.