A hot air brush can give frizz-prone hair the polish of a blow-dry without the coordination of a round brush and dryer. Using a hot air brush on frizz-prone hair works best when the hair is only slightly damp, the prep is smoothing but not heavy, and each section is dried with steady tension rather than repeated passes.
The aim is not to flatten every strand. It is to dry the cuticle in one direction, control the roots, and finish the ends before humidity, overworking or too much product has a chance to create puffiness.
At a glance
- Start on towel-dried hair that is mostly dry, not dripping wet.
- Use a light leave-in or smoothing product, then a heat protectant suited to your hair texture.
- Work in small, clean sections so the brush can dry and smooth evenly.
- Keep the airflow moving from root to tip to encourage a neater cuticle finish.
- Choose your goal first: root lift, soft bend or sleekness. If you are unsure, this guide to whether volume, waves or sleekness should come first helps you avoid fighting the finish.
Why frizz appears when you use a hot air brush
Frizz usually shows up when the outer layer of the hair does not sit smoothly. With a hot air brush, that can happen for a few practical reasons: the hair is too wet, the section is too large, the brush is moved too quickly, or the hair is repeatedly blasted in different directions.
Unlike a straightener, a hot air brush combines airflow, heat and bristle tension. That makes it more forgiving for everyday styling, but it also means technique matters. If the airflow roughs up the surface before the section is properly controlled, frizz can appear even when the ends feel dry.
Hair condition matters too. Colour-treated, bleached, high-porosity or naturally textured hair may swell more readily in damp weather. If your hair looks smooth indoors then expands during a British drizzle, your styling routine needs moisture control, not just extra heat.
Step 1: Prep the hair before the tool goes near it
Start with a wash routine that leaves your hair clean but not stripped. Frizz-prone hair often behaves better when the lengths are conditioned thoroughly and the roots are not coated with heavy product. Rinse well, then squeeze out excess water rather than roughing the hair with a towel.
A microfibre towel or soft cotton T-shirt can help reduce friction while drying. Detangle gently from the ends upwards with a brush or comb suited to your texture. If your hair knots easily, do this before applying styling products so you are not dragging product unevenly through tangles.
Apply a small amount of leave-in conditioner or smoothing cream through the mid-lengths and ends. Fine hair normally needs less than thick or coarse hair. Follow with heat protectant, checking the product instructions for how it should be applied and whether it suits damp or dry styling.
If your frizz is linked to visible breakage, bleach or regular hot-tool use, styling alone will not fix the feel of the hair. A repair-focused routine may help reduce the roughness you are trying to smooth; our K18 Leave-In Molecular Repair Mask review for heat damage explains where that type of treatment fits.
Step 2: Rough-dry to the right point
The most common hot air brush mistake is starting too soon. Many hot air brushes are designed for damp styling, but they usually perform best when the hair is already mostly dry. If your roots are wet and your ends are saturated, you will spend too long brushing the same areas, which can encourage puffiness and tired-looking ends.
Use a towel, air-drying time or a hairdryer on a gentle setting until the hair feels damp rather than wet. As a simple check, a section should feel cool and flexible, but it should not drip or clump together. Very thick hair may need more pre-drying at the roots, while fine hair may be ready sooner.
For curly or wavy hair, decide whether you want to stretch the pattern or keep some movement. A hot air brush will usually soften and elongate natural texture rather than preserve defined curls. If curl definition is your main goal, a diffuser or heatless method may be a better starting point.
Step 3: Section for control, not speed
Small sections are not just a salon habit. They give the brush enough contact to smooth the surface without snagging or overworking the hair. Clip the top layers away and begin underneath, especially if the nape area is dense or prone to swelling.
For fine frizz-prone hair, use wider but shallow sections so you do not collapse all the volume. For thick, coarse or high-density hair, take narrower sections and spend more time at the roots. If one pass leaves the underside damp, the section is too large.
Keep each piece neat before placing it on the brush. Twisted, crumpled or uneven sections dry into that shape. A quick detangle before styling each section makes the finish smoother and reduces the temptation to keep brushing once the hair is already dry.
Step 4: Use tension without yanking
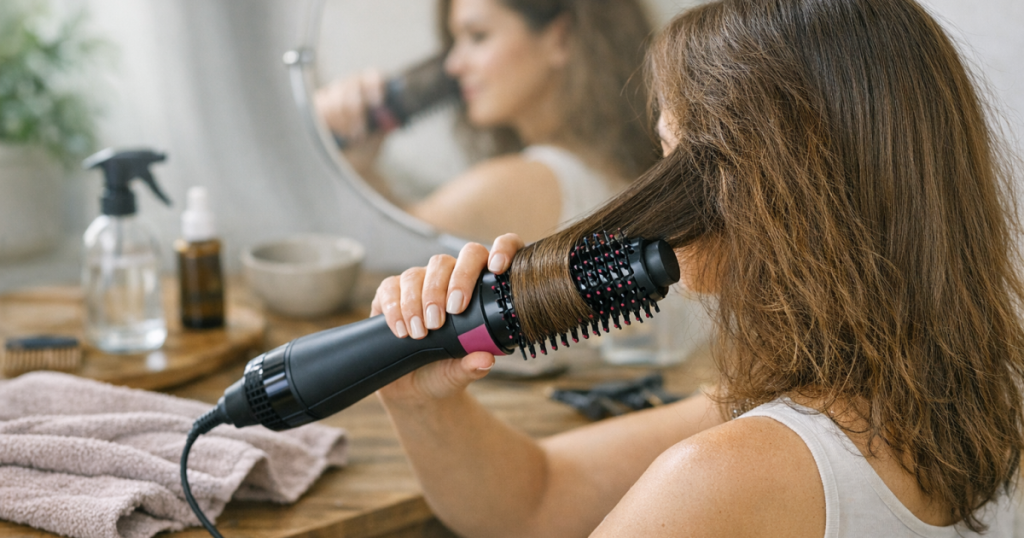
Tension is what turns a hot air brush from a warm brush into a smoothing tool. Place the brush under the section near the root, hold the ends lightly with your other hand if needed, then glide slowly towards the tips. The movement should feel controlled, not forceful.
On frizz-prone roots, pause briefly near the scalp while keeping the brush moving enough to avoid discomfort. Then direct the section downwards. For lift, over-direct the root slightly upwards first, then smooth the lengths down. For a sleeker finish, keep the section taut and angled down from the start.
Avoid rolling the brush in and out repeatedly while the hair is still damp. That can tangle the surface and make the ends fluffy. If you want bend, smooth the section first, then rotate the last few centimetres around the barrel once the hair is nearly dry.
Step 5: Match the technique to your hair type
Fine hair with halo frizz
Fine hair can look frizzy and flat at the same time. Use minimal product, focus heat protectant on the lengths, and avoid heavy oils at the roots before styling. Lift the root gently, then smooth the top layer with light tension. Too many slow passes can make the hair limp.
Thick or coarse hair
Thick hair usually needs more drying before styling and smaller sections during styling. Concentrate on getting the roots dry, because damp roots can expand later and make the whole shape look bigger than intended. A larger oval brush may help smooth broader sections, but only if the hair is dry enough for the brush to control it.
Wavy hair that frizzes around the crown
Work with the direction of growth at the crown rather than brushing randomly backwards. Smooth the canopy first, then add bend through the ends. If you want loose movement, do not brush every section completely straight before shaping; leave a little softness through the mid-lengths.
Damaged or porous hair
Use the lowest effective setting available on your tool and reduce repeated passes. Porous ends often dry faster than roots, so protect them from being restyled again and again while you try to dry the upper section. A trim, bond-care routine or more heatless styling days may make a bigger difference than stronger styling products.
Tool examples and what to check
Different hot air brushes behave differently, so treat brand examples as reference points rather than automatic matches. The Revlon One-Step Volumiser Plus is a recognisable oval-brush style, while the BaByliss Hydro-Fusion Air Styler is another familiar UK-market example. Before choosing or using any model, check the barrel shape, bristle feel, heat settings, airflow strength and whether the instructions recommend use on damp or mostly dry hair.
For frizz-prone hair, the most useful features are not always the most dramatic-sounding ones. A comfortable handle, manageable barrel size and controllable heat setting can matter more than chasing the fastest possible dry. If the brush is too large for your layers, you may lose root control. If it is too small for dense hair, styling can take longer and lead to overworking.
If you travel with your tool, do not assume it will work safely abroad just because the plug fits an adaptor. Check the rating label and the destination’s supply before packing; the difference between a plug and a converter is explained in our guide to plug adaptors and voltage converters for hair tools abroad.
Finishing without bringing the frizz back
Once each section is dry, let it cool before touching it too much. Hair sets better when it is left alone for a minute, especially if you have added root lift or turned the ends under. Running fingers through too early can disturb the surface you have just smoothed.
Use a tiny amount of serum, cream or lightweight oil only where needed. Rub it between your palms first, then skim the outer layer and ends. Avoid coating the crown heavily, as that can separate fine hair or make thick hair look greasy before the day is over.
A humidity-resistant spray such as Color Wow Dream Coat Supernatural Spray is often used by people trying to manage frizz, but always check the instructions and suitability for your hair type rather than layering it automatically with every other styling product. Too many smoothing products can create dullness, residue and a finish that drops quickly.
Mistakes that make frizz worse
- Starting on soaking-wet hair and using the brush as a full dryer for every section.
- Using large sections that look smooth on the outside but stay damp underneath.
- Brushing upwards through the top layer when you actually want sleekness.
- Adding oil before the hair is dry, then repeatedly heating the same ends.
- Using the hottest setting because the hair is frizzy, rather than improving section size and tension.
- Brushing the finished style too aggressively, which breaks up the smooth surface.
Common questions
Should frizz-prone hair be wet or dry before using a hot air brush?
It should usually be damp to mostly dry, not soaking wet. Roots can be slightly damper than ends, but dripping sections take too long to smooth and are more likely to puff up.
Can a hot air brush replace straighteners?
It depends on the finish you want. A hot air brush is better for a soft blow-dry effect with movement, while straighteners give a flatter, more compressed result. For frizz-prone hair, the brush can look more natural if your technique is controlled.
Why do my ends look fluffy after using one?
The ends may be too dry, damaged or over-brushed. Smooth the lengths first, add bend only at the end of the pass, and avoid reheating the last few centimetres while you are still trying to dry the roots.
Do I still need heat protectant?
Yes, a hot air brush is still a heated styling tool. Choose a heat protectant that suits your texture and apply it as directed, especially through the mid-lengths and ends.
Is a hot air brush suitable for curly hair?
It can be, if your goal is a stretched blow-dry or softer wave. If you want to keep defined curls, use a curl-friendly drying method instead and save the brush for occasional smoothing.
What stands out
The best results come from slowing down at the preparation stage, not from turning the tool up and rushing through large sections. A hot air brush on frizz-prone hair is most effective when the hair is pre-dried, sectioned neatly and styled with steady downward tension.
If your hair still expands after styling, look at the whole routine: wash-day moisture, product weight, damage, humidity and whether your chosen finish suits your natural texture. The smoother result is usually a combination of the right tool behaviour and the right amount of restraint.