Curtain fringe pieces can look polished when they have lift at the root and a soft flick through the ends, but they can also drop quickly if the roller is too small, too loose or placed in the wrong direction. The easiest way to set curtain bangs with Velcro rollers is to lift the roots, roll the front sections away from the face, then let the hair cool or dry in that shape. You are not trying to create a ringlet; you are building a soft bend, a centre-parted sweep and enough lift to keep the front from collapsing by lunchtime.
The method works on dry hair, slightly damp hair or hair that has just been blow-dried, but the timing and product choice should change with your hair type. Fine hair usually needs less product and more cooling time, while thick or wavy hair often needs cleaner sectioning and a little more smoothing before the roller goes in.
The quick shape to aim for
For a modern curtain bang set, the front pieces should lift up at the root, curve away from the centre parting, then fall softly into the sides. The most common mistake is rolling the hair straight forwards and expecting it to split neatly afterwards. That can create a rounded fringe shape, but not the soft curtain effect.
- For airy lift: roll the section up and back, keeping the hair elevated from the scalp.
- For a stronger flick: angle each side section slightly away from the face as you wrap it.
- For a softer finish: use a larger roller and brush the set out gently with your fingers.
- For a longer-lasting set: allow the hair to become fully cool or fully dry before removing the roller.
If you are still deciding whether you need more lift, shape, smoothness or hold from your styling routine, the styling goal matrix is a useful way to separate the result you want from the tool you reach for.
What you need before you start
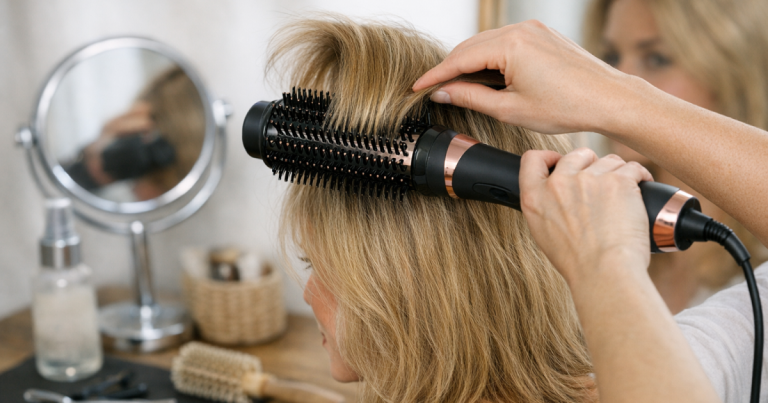
You do not need a complicated kit. A medium to large Velcro roller, a clip and a light styling product are usually enough. For most curtain bangs, a roller around 30–45 mm works better than a tiny roller because it creates lift and bend rather than a tight curl. Shorter fringe pieces may need the smaller end of that range; longer cheekbone-length pieces can usually take a larger roller.
- Velcro roller: choose one that grips without snagging or making the section feel stretched.
- Sectioning clip: use this to hold the roller in place if your hair is silky, heavy or layered.
- Comb or detangling brush: smooth the section first so the ends wrap cleanly.
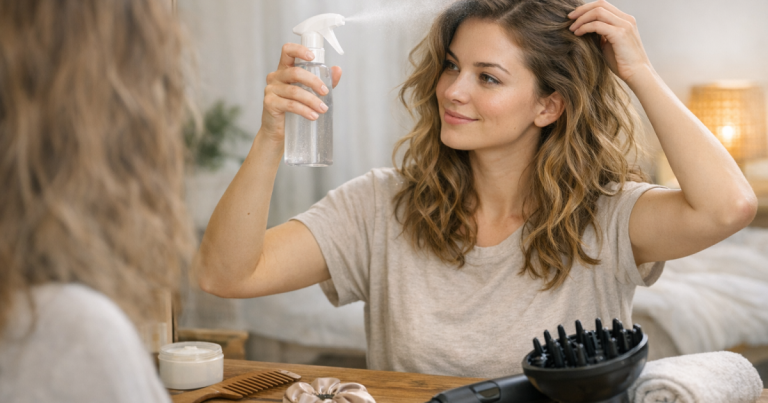
- Light hold product: mousse, styling mist or a very small amount of flexible hairspray can help, but avoid anything sticky at the roots.
Start with hair that is dry to the touch or only slightly damp. Wet fringe pieces wrapped around a roller can take longer to dry than expected, and removing the roller too early usually leaves the shape limp rather than bouncy.
Step-by-step: the roller placement that works
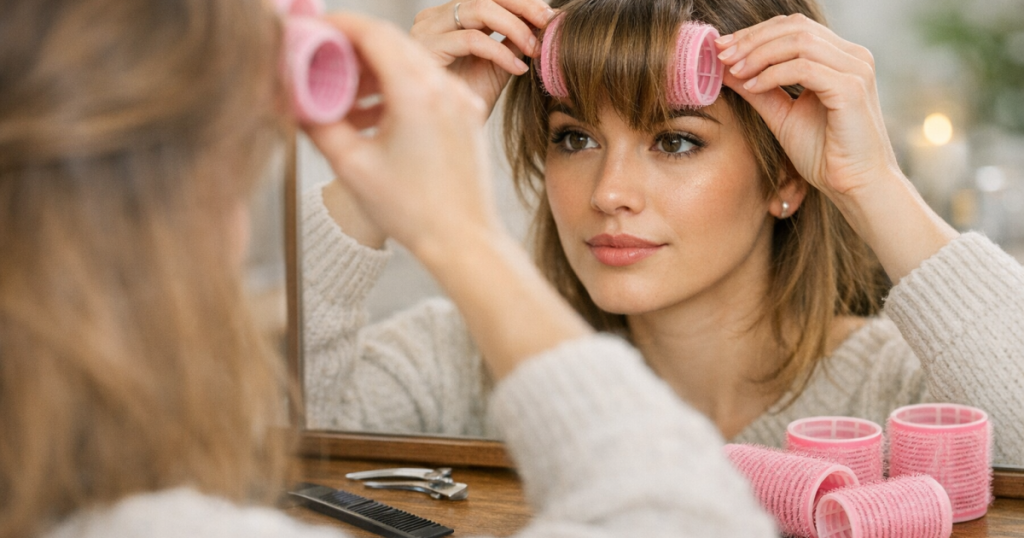
1. Find your natural parting
Let the front of your hair fall where it usually wants to split, then refine the parting with your fingers or a comb. Curtain bangs look more effortless when they follow your natural growth pattern rather than fighting it. If you have a cowlick at the hairline, set the hair with a little extra tension and allow more cooling time.
2. Section the fringe in a triangle
Take a neat triangle from the front hairline back towards the crown, using only the hair that forms your fringe or face-framing layers. Keep the side hair out of the way. If you include too much hair, the roller becomes bulky and the shorter pieces may not grip evenly.
3. Lift the section before rolling
Hold the fringe up and slightly forward from the scalp, then place the roller behind the ends. Smooth the ends over the roller first, then roll down towards the roots. The lift you create before rolling is what gives the finished fringe its height.
4. Roll back, not straight down
For a soft curtain effect, roll the main front section back away from the face. If your bangs are long enough to split into two halves, set each side diagonally away from the centre parting. This helps the hair open out at the cheekbones rather than sitting as one solid piece across the forehead.
5. Secure without flattening
If the roller feels loose, clip it at the base without pressing the fringe flat. The clip should stop the roller slipping, not squash the root. On fine hair, a heavy clip can leave a dent, so use the lightest clip that keeps the roller steady.
6. Let the shape set properly
Leave the roller in until the hair has cooled from blow-drying or dried fully from a light misting. As a rough guide, allow 10–20 minutes for a quick dry-hair refresh, and longer if the hair was damp. The set is mainly created by the hair cooling or drying in its new shape, so rushing this step is the fastest way to lose lift.
7. Remove and place with your fingers
Unwind the roller gently rather than pulling it straight out. Use your fingers to split the fringe and direct each side away from the face. Avoid heavy brushing at first; it can turn the bend into fluff, especially on fine or wavy hair. Finish with a light mist of flexible hairspray if your fringe tends to separate or drop.
Adjustments by hair type
Fine hair: use less product than you think. Too much mousse, oil or hairspray can make the roots collapse. A larger roller often gives a more expensive-looking sweep because it avoids a tight curl at the ends. If your hair loses shape quickly, the tips in making heatless curls last on fine hair apply well to fringe setting too: start with clean, light hair and prioritise cooling time.
Thick hair: do not overload one roller. If your curtain bangs are dense or blended into face-framing layers, split the section into a top piece and two side pieces. Thick hair often needs more direction, so roll with firm, even tension and secure the roller close to the root without compressing it.
Wavy hair: smooth the fringe section before rolling, but do not brush through the rest of your waves unless you want a softer, expanded finish. A little leave-in styling cream on the ends can help the wrap look neater, but keep the roots light so the fringe still lifts.
Straight, slippery hair: add grip before rolling. A light texture mist or a small amount of mousse through the fringe can stop the roller sliding out. Let the set cool completely before touching it, then use minimal brushing.
Layered or grown-out bangs: use one roller for the shortest middle pieces and separate rollers for the longer side pieces. This prevents the centre from springing too high while the sides remain flat.
Dry hair, damp hair or after blow-drying?
Dry hair is best for a quick morning refresh. Mist lightly only if your hair needs extra reshaping, then let it dry fully before removing the roller. Damp hair can create a stronger set, but it is less convenient if your fringe is thick or low porosity because the hair may still feel cool and soft when you remove the roller.
After blow-drying is often the most reliable option. Blow-dry the fringe roughly into the direction you want, then roll it while the hair is still warm. This gives you the smoothness of a blow-dry with the softer, lower-effort finish of a roller set. If you are choosing between a roller, brush, dryer or heatless tool for a different finish, matching the tool to your desired hair look can help you decide what is worth using for the result you want.
Common setting problems and quick fixes
- The fringe looks too curled: your roller is probably too small or the hair was rolled too tightly. Use a larger roller and remove it sooner once the shape has cooled.
- The roots are flat: lift the section higher before rolling and avoid clipping the roller in a way that presses the hair down.
- The ends flick in the wrong direction: check the angle. For curtain bangs, the side pieces need to move away from the centre of the face.
- The roller gets stuck: detangle first, wrap the ends neatly and unwind slowly. Do not drag the roller through backcombed or heavily sprayed hair.
- The shape drops quickly: use lighter conditioning products near the fringe, set for longer and finish with flexible hold rather than a wet, heavy spray.
Helpful questions
Can I set curtain bangs with Velcro rollers on dry hair?
Yes. Dry hair works well when you want a quick lift or to revive slept-on fringe pieces. For better hold, warm the section briefly with a dryer first, then roll it while warm and leave it to cool.
Should the roller go under or over the fringe?
For the classic curtain effect, place the roller so the hair rolls back and away from the face. Rolling under can create a rounded fringe, which is softer but less swept.
How long should I leave the roller in?
Leave it until the hair is completely cool or dry. On dry, warm hair this may be around 10–20 minutes; on damp or thick hair, it can take longer.
Why do my curtain bangs separate into strings?
This usually comes from too much product, oily roots or not enough smoothing before rolling. Use less product at the hairline and separate the finished fringe with fingers rather than a heavy brush.
Can I sleep with a Velcro roller in my fringe?
It is usually not the neatest option. Velcro can tug at short front pieces while you sleep, and the root may flatten. A quick morning set gives more control.
The big picture
Once you can set curtain bangs with Velcro rollers confidently, the result becomes easy to customise: bigger roller for airy movement, smaller roller for a stronger flick, diagonal placement for face-framing sweep and longer setting time for better hold. The real trick is not the roller itself, but the combination of clean sectioning, lifted roots, correct direction and enough time for the hair to cool or dry. Get those details right and your curtain bangs should look intentional rather than over-styled.