Sleeping in a curl set should not mean waking up with a fuzzy halo, flattened roots or tangled ends. The easiest way to keep heatless curls without frizz is to start with the right moisture level, wrap tension and overnight protection, then release the curls gently in the morning. Small changes matter more than a complicated routine.
At a glance
- Best starting point: hair that is fully dry or only very slightly damp, depending on your texture and how well your hair holds shape.
- Best frizz prevention: a satin or silk barrier, either as a bonnet, scarf, wrap or pillowcase.
- Most common mistake: wrapping hair too tightly, sleeping on loose ends, or adding too much product before bed.
- Fine hair needs: lighter prep, lower tension and smaller sections only where extra shape is needed.
- Thick, coarse or curly hair needs: smoother detangling, more controlled sections and stronger overnight containment.
Why overnight curl sets go frizzy
Frizz usually comes from friction, moisture imbalance or disturbed curl direction. When hair rubs against cotton bedding, the cuticle lifts and the curl pattern becomes fluffy rather than defined. If the hair is too wet when you go to bed, it may dry in an uneven position, leaving some pieces stretched and others crumpled. If it is too dry and product-free, it may not have enough slip to stay smooth while wrapped.
The aim is not to glue every strand into place. A good overnight set should feel comfortable enough to sleep in, controlled enough to survive movement, and gentle enough that you are not pulling at roots or stretching fragile ends. Think of it as setting the hair in a protected position rather than forcing it into a rigid curl.
Step 1: Start with the right moisture level
For most people, the safest overnight starting point is hair that is dry to the touch with only a hint of flexibility. If your hair holds shape easily, especially fine, bleached or naturally wavy hair, wrapping it too damp can create puffiness, dents and weak-looking ends by morning. Let it air-dry first, then mist only the mid-lengths if you need a little grip.
Thicker, coarser and curlier hair can usually handle slightly more moisture, but it should still not feel wet. Damp hair trapped under a scarf or bonnet may dry slowly and unevenly, particularly in cool UK bedrooms during winter. If your roots take hours to dry, keep water away from the scalp area and focus any light misting on the lengths.
Quick moisture check
- If your hair feels cold against your neck, it is probably too damp for sleeping in a wrapped set.
- If ends feel rough or crunchy before wrapping, smooth them with a tiny amount of leave-in product or oil rather than adding lots of water.
- If your curl set often drops by breakfast, try slightly more moisture or smaller sections next time.
- If your curl set turns fluffy, reduce water and increase friction protection.
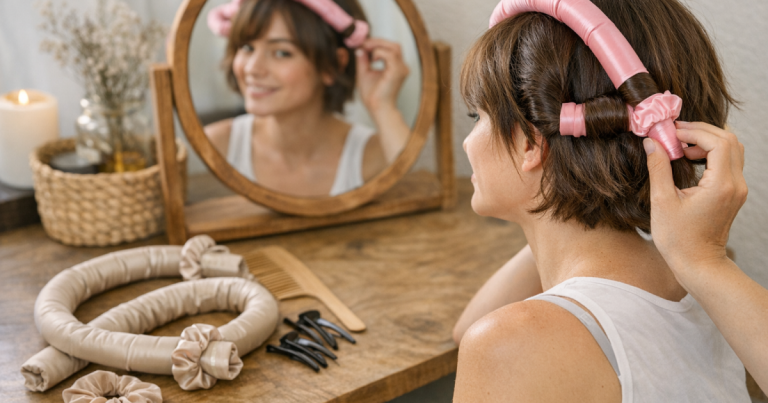
Step 2: Choose a curl position your hair can sleep in
Your curl method affects how much frizz you wake up with. A soft heatless rod, robe belt or satin curling ribbon keeps the curl direction more organised than loose twists, but the position has to suit your haircut and sleeping style. If the tool sits exactly where your head meets the pillow, you may move more during the night and disturb the set.
Long hair usually behaves best when wrapped away from the face and secured low enough that the top layer stays smooth. Medium-length hair often needs smaller front sections so the pieces around the face do not unravel. Short hair can be trickier because the ends have less length to anchor; if that is your issue, the technique in using heatless curling rods on short hair gives more targeted guidance for keeping shorter layers tucked in.
If you are using a satin rod, keep the first wrap smooth rather than tight. The first turn sets the direction of the curl; the rest simply supports it. Pulling too firmly at the root can cause tension, flatten volume and leave odd bends near the hairline.
Step 3: Prep with slip, not weight
Overnight frizz control is often more about product amount than product type. Too little product gives the hair no protection against friction. Too much product makes curls collapse, feel coated or separate into stringy pieces. Start with less than you think you need, then adjust after seeing the morning result.
Fine hair usually needs a light leave-in spray, a small amount of curl cream rubbed thoroughly between the palms, or just a smoothing brush-through before wrapping. Avoid heavy oils at the root because they can make the crown look flat by morning. If you want softer definition, apply product from ear level down and leave the root area clean.
Thick or coarse hair can take a richer cream or a little oil on the ends, but even then, use it as a finishing layer rather than a mask. Detangle first, smooth the surface with your hands, then wrap. Product cannot rescue a tangled section once it has been twisted into the set.
For fine hair that struggles to hold overnight shape, it may help to look at how the tool itself behaves. The Kitsch Satin Heatless Curling Rod review for fine hair covers the kind of grip, softness and comfort details that can affect whether a set stays neat while you sleep.
Step 4: Secure the ends properly
Loose ends are one of the quickest routes to morning frizz. Ends are older, drier and more fragile than the hair near your roots, so they need to be tucked into the curl pattern rather than left poking out. When wrapping around a rod or ribbon, keep the last few centimetres flat against the tool and secure them with a soft scrunchie or a gentle fabric tie.
Avoid small rubber bands, tight elastics and metal clips for overnight wear. They can leave dents, snag the cuticle or make you loosen the whole set during the night because it feels uncomfortable. If you need extra hold, use a soft scrunchie around the wrapped section rather than clamping directly onto the ends.
For layered hair, take your time with the shorter pieces. Smooth them into the section before each wrap rather than trying to tuck them all at the end. This keeps the curl direction cleaner and reduces the fluffy pieces that appear around the cheeks and neckline.
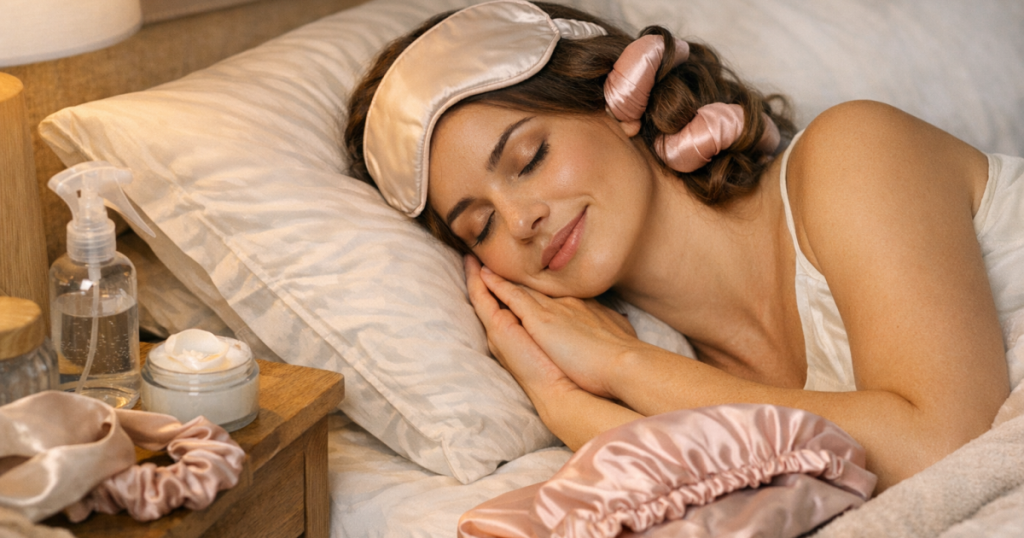
Step 5: Add a satin or silk barrier
A protective outer layer is the biggest difference between a curl set that survives the night and one that turns fuzzy. Satin and silk reduce friction better than standard cotton, so the wrapped hair slides rather than rubs when you move. You can use a bonnet, scarf, turban-style wrap or pillowcase, depending on what stays put for you.
A bonnet is easy if your curl set sits close to the head, but it can squash bulky rods if the fit is too tight. A scarf is more adjustable and useful for keeping the hairline smooth, but it needs to be tied securely without pressing into the forehead. A satin pillowcase is the least restrictive option, although it gives less containment if you sleep restlessly.
Match the protection to your hair type
- Fine hair: choose lightweight satin or silk so the hair is protected without being compressed flat.
- Thick hair: use a roomier bonnet or scarf so the wrapped sections are covered without being crushed.
- Curly or coily hair: prioritise full coverage, including the nape and edges, where friction often shows first.
- Oily roots: keep creams and oils away from the scalp, then use a pillowcase or loose wrap rather than a tight bonnet.
- Fringe or face-framing layers: clip or wrap these separately if they spring loose from the main set.
Step 6: Sleep in a way that does not crush the set
You do not need to stay perfectly still all night, but positioning helps. If your curl rod sits across the top of your head, try sleeping slightly to one side with the bulk of the tool behind the crown rather than under your cheek. If your hair is wrapped into two side sections, place each section slightly behind the shoulder so you are not lying directly on the curls.
Back sleepers often do best with the wrapped hair lifted towards the crown and protected with a scarf or bonnet. Side sleepers may prefer two softer side wraps rather than one bulky central rod. If you change position frequently, focus less on perfect placement and more on secure ends, a smooth outer barrier and comfortable tension.
Comfort is not a small detail. If a tool pulls, digs in or feels too bulky, you will adjust it in your sleep, which creates more frizz than a looser set would have done. A slightly softer wave that stays smooth is usually more wearable than a tighter curl pattern that becomes messy overnight.
Morning release without creating frizz
The way you take down the set matters almost as much as the way you slept in it. Remove the scarf or bonnet first, then let the hair settle for a minute before unwrapping. Do not rake through the curls immediately. Unwind each section in the same direction it was wrapped, letting the curl fall into your hand rather than pulling it straight.
If the curls look too formed, separate them with lightly oiled fingertips or clean, dry hands. Start underneath, then lift at the root for volume. For fine hair, avoid brushing unless you want a softer wave. For thick or curly hair, separate only where the curl naturally wants to split, then smooth the surface with your palms.
If a few pieces have lost shape, refresh only those areas rather than reworking the whole head. A light mist on the flattened section, a quick finger coil or a soft re-wrap while you get ready can be enough. For a full next-day routine, reviving second-day waves without rewashing is the more useful next step.
Common overnight mistakes and quick fixes
- Waking up with a fuzzy crown: reduce product at the roots, smooth the top layer before wrapping and use a scarf to hold the hairline in place.
- Curls dropping out by morning: start with slightly more moisture, use smaller sections or wrap the hair with a little more even tension.
- Ends looking frayed: add a tiny amount of smoothing product to the last few centimetres and make sure the ends are tucked flat.
- Flat roots: avoid tight wrapping near the scalp and position the tool so it does not press directly on the crown.
- Uneven curl pattern: keep section sizes consistent on both sides and wrap away from the face for a more balanced finish.
Things readers ask
Should hair be wet or dry before sleeping in heatless curls?
For most hair types, dry or barely damp hair works best. Wet hair is more likely to dry unevenly, feel uncomfortable and wake up frizzy, especially if it is covered overnight.
Is a bonnet or satin pillowcase better?
A bonnet gives more containment, which helps thick, curly or restless-sleeper hair. A satin pillowcase feels less restrictive and is useful for fine hair or anyone who dislikes sleeping with a head covering.
Why do my heatless curls look good at first, then frizz after separating?
You may be separating too early, using dry hands, or pulling curls apart against their natural split. Let the set settle, add a trace of smoothing product to your fingertips and separate from the ends upwards.
Can I sleep in heatless curls every night?
Yes, provided the style is comfortable, not tightly pulling at the roots and not repeatedly stressing the same sections. Vary the placement and keep the ends protected.
How do I stop face-framing pieces going fluffy?
Wrap them in smaller, smoother sections and secure the ends carefully. A scarf tied over the hairline can help stop shorter layers from rubbing against the pillow.
Key takeaways
Smoother overnight curls come from controlled moisture, gentle tension, protected ends and reduced friction. Fine hair generally needs lighter prep and less compression, while thick, coarse and curly hair benefits from more secure sectioning and fuller satin or silk coverage. If your set keeps failing, change one variable at a time: moisture level, product amount, wrap position or night-time protection. That makes it much easier to find the routine that gives you soft, defined curls without adding heat.