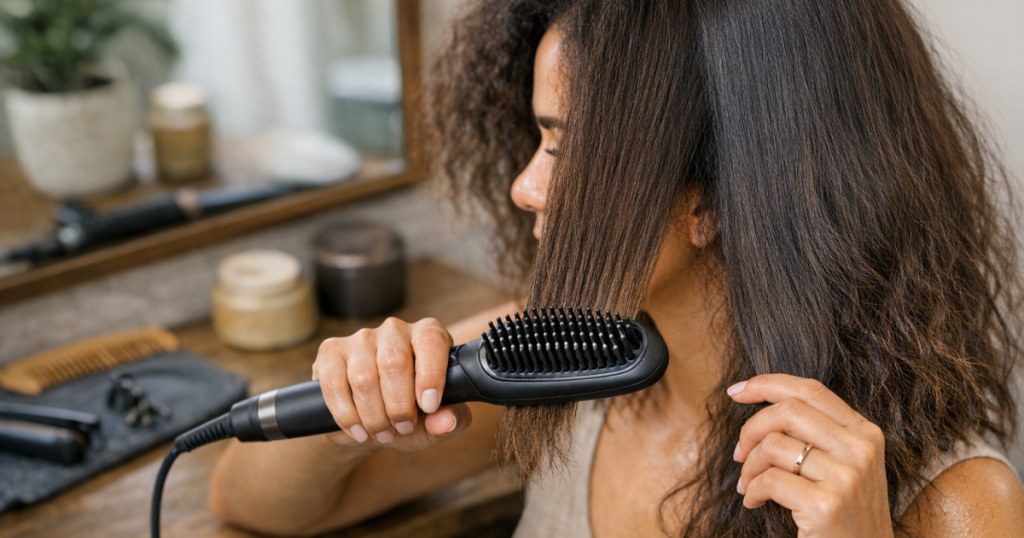
A hair straightening brush on coarse hair can soften bulk, smooth the surface and stretch waves, but it will not behave like straighteners. The finish depends far more on prep, section size and tension than simply brushing through from root to tip.
For coarse, dense or resistant hair, treat the tool as a smoothing brush with heat rather than a one-pass straightener. The aim is controlled stretch, less puffiness and a polished surface while keeping some natural body.
The short version
- Start with completely dry, detangled hair; damp patches can turn coarse hair puffy and uneven.
- Use smaller sections than you think, usually around 3–5 cm wide, so heat and tension reach the inner layers.
- Brush slowly from underneath each section first, then skim the top for polish.
- Keep the roots controlled, but avoid pressing the hot brush hard into the scalp.
- Finish with a cool-down period before adding oil or serum, so the shape has time to settle.
What a straightening brush can and cannot do on coarse hair
A heated straightening brush is designed to smooth and stretch hair while the bristles separate the strands. On coarse hair, that separation can be helpful because it reduces the flat, clamped look that straighteners can create. The trade-off is that it usually gives a softer, blow-dried finish rather than a glass-straight result.
If your hair is coarse and wavy, a hot brush can make the lengths look more controlled and less expanded. If your hair is coarse, coily or very tightly textured, it may stretch the hair and smooth the outer surface, but it is unlikely to fully straighten the curl pattern without extra heat-tool passes. That is not a failure; it is the nature of the tool.
Brushes such as the ghd Glide Hot Brush or TYMO Ring Plus are examples of heated brush-style tools, but the same technique principles apply across the category: dry hair, steady tension, manageable sections and a realistic expectation of the finish. If your main issue is working out whether a brush, dryer, straightener or roller actually suits your texture, the guide to hair type styling problems and the tools that fix them is a useful next step.
Step 1: Start with the right wash-day base
Coarse hair often needs moisture and slip before it needs heat. If the hair feels rough, brittle or squeaky-clean, a straightening brush can make the surface look bigger rather than smoother. Use a conditioner or mask that leaves the hair flexible, then rinse thoroughly so the roots are not weighed down.
After washing, blot with a towel rather than rubbing. Rubbing lifts the cuticle and can make coarse strands expand before styling even begins. If your hair tangles easily, work through a detangling brush or wide-tooth comb while the hair is conditioned or after applying a leave-in product.
The key rule is simple: do not use a heated straightening brush on wet hair unless the specific tool is clearly designed and labelled for wet-to-dry styling. Most straightening brushes are intended for dry hair. Using them on damp hair can lead to steam, uneven results and unnecessary stress on the strand.
Step 2: Dry the hair fully before brushing
Coarse hair can feel dry on the surface while holding moisture inside thicker sections, especially at the nape and crown. Before using the brush, check the underside of the hair, the roots and any dense areas around the back of the head. They should feel fully dry and cool, not clammy.
If you air-dry first, smooth the hair into its intended direction as it dries. If you blow-dry, rough-dry until almost dry, then direct the airflow down the hair shaft for the final stretch. A straightening brush works better when it is refining an already organised shape, not trying to rescue a random dry-down pattern.
Before reaching for any tool, decide what finish you actually want: soft and stretched, sleek at the roots, tucked-under ends, or a smoother version of your natural texture. Planning the result first stops you overworking the hair, and the advice on planning your style before choosing a hair tool explains this decision-making process in more detail.
Step 3: Protect, detangle and section properly
Apply heat protectant evenly through the mid-lengths and ends, then let it dry down if it has made the hair feel damp. Coarse hair often needs product distribution in layers rather than one spray over the top. Lift the hair and apply lightly underneath as well as on the outer surface.
Detangling matters because a straightening brush should glide. If it snags, you will slow down in the wrong places, pull the hair unevenly and create frizz around the brush path. Work out knots with a non-heated brush first, starting at the ends and moving upwards.
Sectioning is where coarse hair styling usually succeeds or fails. Divide the hair into at least four main zones: back lower, back upper, left side and right side. If your hair is very dense, split those zones again. Clip away everything you are not working on so the brush only has to manage one clean section at a time.
Step 4: Use the brush from underneath first
Take a section around 3–5 cm wide. Hold the ends with light tension, place the brush underneath the section near the roots, then glide slowly downwards. This supports the hair from below and helps stretch the underside, which is often where coarse hair stays bulky.
Do not rush the pass. Coarse strands need a steady glide so the section warms evenly. Moving too quickly means the outer hairs may look slightly smoother while the inner hairs remain expanded. Moving too slowly in one spot, however, can overheat the same area, so aim for a controlled continuous motion.
Once the underside has been brushed, pass the tool lightly over the top of the same section. This second pass is for surface polish, not aggressive straightening. Keep the brush moving and follow with your free hand only once the hair has left the heated area.
Step 5: Control the roots without flattening everything
Roots are often the most resistant part of coarse hair because they are denser, newer and closer to the natural growth pattern. Start near the root, but do not jam the brush into the scalp. Lift the section away from the head, place the brush just below the root area and glide with tension.
For volume, pull the section slightly upwards before gliding down. For a sleeker shape, pull the section out and down in the direction you want it to sit. Around the hairline, use smaller pieces and lower pressure; these hairs are usually more fragile and more obvious if they become frizzy.
If your roots puff back up quickly, the issue may not be the brush alone. Product build-up, incomplete drying, humidity and natural texture can all cause rebound. A finishing routine and overnight wrap often make more difference than repeated heat passes.
Step 6: Shape the ends deliberately
Coarse ends can look blunt, dry or fluffy if the brush is pulled straight off the hair with no direction. For a softer finish, turn the brush slightly under at the last few centimetres. For movement away from the face, angle the front sections backwards as you glide through the ends.
If your ends are very dry, avoid repeatedly brushing them with heat. Smooth the mid-lengths first, then give the ends one lighter pass. After the hair cools, use a tiny amount of hair oil or serum through the ends only. Start with less than you think; coarse hair can usually take more product than fine hair, but too much will still collapse movement.
Common mistakes that make coarse hair puffier
- Using sections that are too large: the brush only smooths the surface while the middle of the section stays textured.
- Starting on damp hair: trapped moisture can cause swelling, steam and a rougher finish.
- Skipping tension: the tool needs gentle stretch from your hand as well as heat from the brush.
- Overbrushing the canopy: too many top-layer passes can create static and make the hair look airy rather than sleek.
- Adding oil too early: oily product before heat can make hair feel coated and harder to smooth evenly.
How to make the finish last longer
Let the hair cool completely before touching it too much. Coarse hair can look smooth while warm, then expand as it cools if the shape has not set. After brushing each section, lay it down in the direction you want it to sit and avoid shaking it out immediately.
In damp UK weather, use a light anti-humidity finishing product through the outer layer if your hair responds well to it. Focus on the surface and ends rather than the scalp. If your hairline or parting frizzes first, smooth those areas with the least amount of product and avoid repeatedly reheating them during the day.
When humidity is the main problem, a straightening brush may reduce bulk but not seal tiny flyaways as firmly as plates. The article on whether mini straighteners can control frizz in humid weather is useful if you are deciding how much touch-up heat is actually worth using.
When a straightening brush is the wrong tool
Using a hair straightening brush on coarse hair is most useful when you want a smoother, stretched, everyday finish. It is less suitable when you want ultra-sleek, pin-straight hair, very precise face-framing bends, or a sharp glass-hair effect. For those finishes, traditional straighteners usually give more compression and control.
It may also be the wrong choice if your hair is currently fragile from colouring, chemical processing or frequent heat styling. In that case, reduce heat frequency, focus on conditioning and use heatless smoothing methods where possible. A silk wrap, satin heatless curling rod or overnight wrap can help preserve shape between wash days without adding another hot pass.
For coily coarse hair, the brush can be used as a stretch step before protective styling or as a softer alternative to straightening, but it should not be expected to replace a salon-level silk press. Work in tiny sections, keep the hair moisturised and stop if the strands feel dry, rough or unusually resistant.
Main points
- A straightening brush gives coarse hair a smoother, softer stretch rather than a flat iron finish.
- Fully dry hair, small sections and steady hand tension are the three biggest technique upgrades.
- Work from underneath first to reduce hidden bulk, then skim the top layer for polish.
- Let the hair cool before adding finishing product or judging the final result.
- If puffiness returns quickly, look at drying, humidity control and overnight preservation, not just extra heat.
FAQ
Can I use a straightening brush every day on coarse hair?
Daily heat is not ideal for most coarse hair, especially if it is colour-treated, dry or prone to breakage. Try to use the brush for full styling on wash days, then refresh small areas only when needed.
Should I use oil before or after a straightening brush?
Use heat protectant before brushing, then add a small amount of oil after the hair has cooled. Applying oil before heat can leave some hair types feeling coated or heavy.
Why does my hair look smooth at first, then swell later?
The hair may not have been fully dry, the sections may have been too large, or humidity may be affecting the finish. Letting each section cool in place and using a light anti-humidity finisher can help.
Is a straightening brush better than straighteners for coarse hair?
It depends on the finish. A straightening brush is better for a softer, fuller, more natural smooth look. Straighteners are better for a flatter, sleeker and more precise result.
Can I use a straightening brush on coarse curly hair?
Yes, if the hair is fully dry, detangled and protected. Expect stretch and smoothing rather than complete curl removal, and use smaller sections than you would on looser waves.