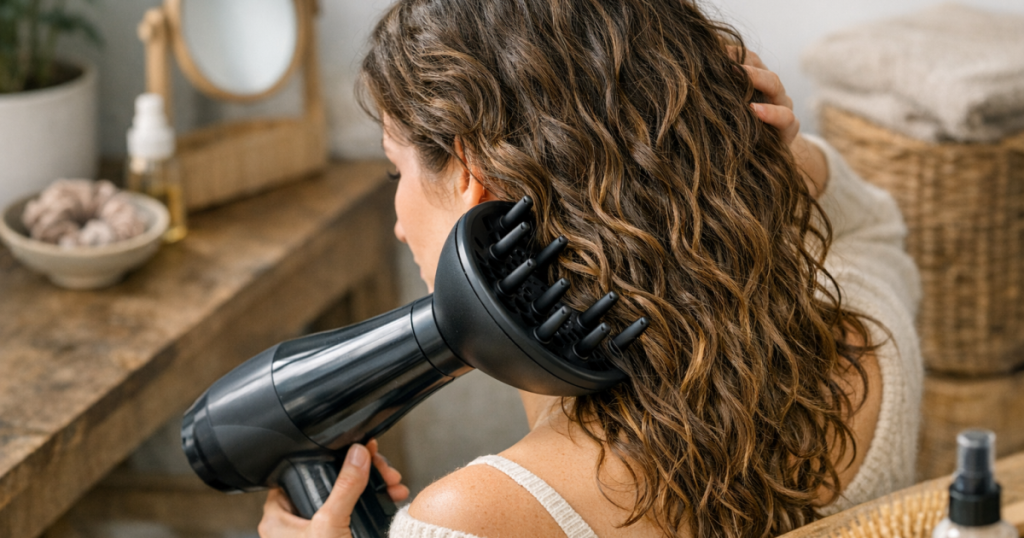
A diffuser can turn limp, air-dried bends into softer definition, but only if you use it patiently. The aim is not to blast your hair dry, but to diffuse wavy hair gently enough that the pattern sets before frizz takes over.
For most wavy hair types, the best results come from a wet-to-damp start, light styling product, low airflow, and minimal touching. Think of the diffuser as a support for your wave pattern rather than a tool that forces curls into place.
At a glance
- Start with hair that is wet or evenly damp, not half-dry in random patches.
- Apply styling product before drying, then leave the hair alone as much as possible.
- Use low speed first; increase heat only if your hair tolerates it without puffing up.
- Dry the roots separately from the lengths so you do not flatten the crown.
- Stop before hair feels bone-dry, then let the final moisture settle naturally.
Before you start: what a diffuser actually changes
A diffuser attachment spreads the air from your hair dryer so the airflow is less direct. On wavy hair, this matters because strong airflow can break up clumps, lift the cuticle, and create that fluffy triangle shape where the ends expand but the roots stay flat.
The bowl or prongs of the diffuser help hold sections in place while warm air dries them. That gives your wave pattern time to set. It will not create a completely different texture, but it can make 2A hair look more polished, 2B hair look more defined, and 2C hair look springier with less frizz.
If you are trying to work out whether your priority is root lift, length definition or smoother ends, the breakdown in choosing tools by your root, length and end goal is a useful next step. Diffusing is strongest when the goal is controlled texture, not a pin-straight or ultra-sleek finish.
Step 1: prep waves while they are still wet
Wavy hair usually behaves best when product is applied before the pattern starts drying unevenly. After washing, gently squeeze out excess water with your hands or a microfibre towel. Avoid rough towel-drying, because that separates the wave clumps before the diffuser has a chance to set them.
Apply product according to your density and wave type:
- Fine 2A waves: use a light mousse or spray gel, focusing from mid-lengths to ends. Heavy creams can pull the pattern down.
- Medium 2B waves: use a small amount of curl cream for softness, then a light gel or foam for hold.
- Coarse or dense 2C waves: use a more conditioning leave-in or curl cream, then a stronger hold product if your hair expands while drying.
- Low-density roots: keep rich products away from the scalp and concentrate styling product through the lower lengths.
Scrunch upwards with your hands to encourage clumps. If your waves are very easily disturbed, use a gentle pulse rather than repeated squeezing.
Step 2: choose the right heat and speed combination
The most common diffuser mistake is using high speed from the start. On wavy hair, airflow is often more disruptive than heat. Begin with low speed and low-to-medium heat. If your hair is dense and takes a long time to dry, you can raise the heat slightly, but keep the speed controlled.
Use the cool shot only when the section is mostly dry. A cool blast at the beginning does not set much, and it can make the routine unnecessarily slow. Towards the end, cooler air helps the wave clumps firm up before you touch them.
If your hair frizzes quickly, keep the dryer moving slowly around your head rather than hovering too long in one spot. If your hair falls flat quickly, focus warm air at the roots first, then cup the lengths once the crown has some lift.
Step 3: dry the roots without crushing the lengths
Root drying makes the biggest difference between soft volume and stretched-out waves. Start upright with your head tilted slightly to one side. Place the diffuser near the roots without grinding the prongs into the scalp. Hold for a few seconds, then move to another area.
For more lift, use your fingers to gently raise a small root section before bringing the diffuser close. Do not rake through the lengths while doing this, as it can split the pattern and create a fuzzy surface.
If your roots are flat but your ends are curly, dry the scalp area until it feels around half dry before cupping the ends. If the ends dry first, the weight of damp roots can pull everything down.
Step 4: cup the lengths in sections
Once the roots have started to lift, move to the lengths. Let a section of hair fall into the diffuser bowl, then raise the diffuser towards your head. Hold it still rather than bouncing it repeatedly. After 20 to 40 seconds, lower the diffuser, release the section, and move on.
Work around the head in sections: one side, the back, the other side, then the crown. The back often needs more time because it holds more moisture and gets less air exposure. If you have thick hair, split the back into smaller sections so the outer layer does not dry while the underneath stays damp.
For mixed patterns, adapt section by section. Looser areas may need less product and less cupping, while tighter areas can handle more support from the diffuser bowl. If your texture changes around the hairline, crown or underneath layers, the guidance on styling tools for mixed-texture hair can help you decide where to adjust your routine rather than treating the whole head the same.
Step 5: stop touching before the cast has set
If you use gel, foam or mousse, your hair may form a slight cast as it dries. That can feel crispy at first, but it is useful: it holds the wave shape while moisture leaves the hair. Touching too early breaks the cast unevenly and often creates frizz before the style is finished.
A good stopping point is when your hair feels about 80 to 90 per cent dry. Let it air-dry the rest of the way, then soften the cast with clean hands. Rub a tiny amount of lightweight oil or serum between your palms if your ends need slip, but avoid adding too much near the roots.
To soften the cast, scrunch upwards once the hair is fully dry. If the waves feel stiff, use gentle open-palmed scrunching rather than combing through. If the shape looks too separated, shake at the roots only and leave the lengths alone.
Common diffuser problems and quick fixes
Your waves turn fluffy
Use less airflow, more water during product application, and fewer hand movements. Fluff usually means the clumps were disturbed before they set. Try applying product to wetter hair next time and hold each section still in the diffuser.
Your roots are flat
Dry the roots first, use less product near the scalp, and change your head position while drying. Tilting side to side often gives better lift than staying upside down for the whole routine, which can tangle the crown on wavy hair.
Your ends look stringy
Stringy ends can come from too much product, not enough water, or over-scrunching. Smooth a little water over the ends before drying, then scrunch once to regroup them. If they still separate, use less styling product next wash day.
The underside stays damp
Section the back more deliberately. Lift the top layer with your hand, place the diffuser near the underneath layers, and dry in shorter passes. Dense wavy hair often needs airflow directed into hidden areas, not just around the visible surface.
How to adapt the method by wave type
For 2A waves, keep everything light. Use low speed, avoid heavy curl creams, and focus on root lift rather than intense cupping. Too much upward scrunching can make 2A hair look uneven instead of softly waved.
For 2B waves, balance hold and movement. A foam or light gel usually helps the bends stay consistent, while medium heat can speed up drying without too much puffiness. Cup the lengths, but do not over-handle once the clumps have formed.
For 2C waves, moisture and sectioning matter more. This texture can look beautifully defined with a diffuser, but it may frizz if the outer layer dries faster than the inner layers. Work in smaller sections and allow the cast to set fully before softening.
If your waves flatten overnight, protect the root lift rather than redoing the whole routine each morning. A loose high gather can help preserve shape, and the technique in pineappling curly hair overnight without crushing volume can be adapted for wavy hair by using less tension and a softer hair tie.
Helpful questions
Should wavy hair be wet or damp before diffusing?
Evenly wet or damp is best. If some areas have already dried, mist them before applying product or diffusing, otherwise the finished texture can look patchy.
Is it better to diffuse upside down?
Upside down drying can add volume, but it can also cause tangles and a messy crown. For many wavy hair types, tilting side to side gives lift with more control.
Can a diffuser make straight hair wavy?
It can encourage slight bends if your hair already has natural movement, but it will not create lasting waves on genuinely straight hair without styling products or a setting method.
Why does my hair look good at first, then frizz later?
The waves may not be fully dry, or the hold product may be too light for your hair. Let the cast set completely before softening, especially in damp UK weather.
Do I need to use heat protectant?
If you use warm or hot airflow regularly, a heat protectant is sensible. Choose one that suits your texture so it does not weigh down the roots or make the lengths sticky.
What to remember
A diffuser works best on wavy hair when it supports the pattern rather than disturbing it. Start with wet, product-prepped hair, use low speed, dry the roots with care, then cup the lengths in still sections. The less you touch while the hair is setting, the smoother and more defined the result tends to be.
If your first attempt feels too flat, adjust the roots first. If it feels too fluffy, reduce airflow and handling. Small changes usually make a bigger difference than adding more product or drying for longer.