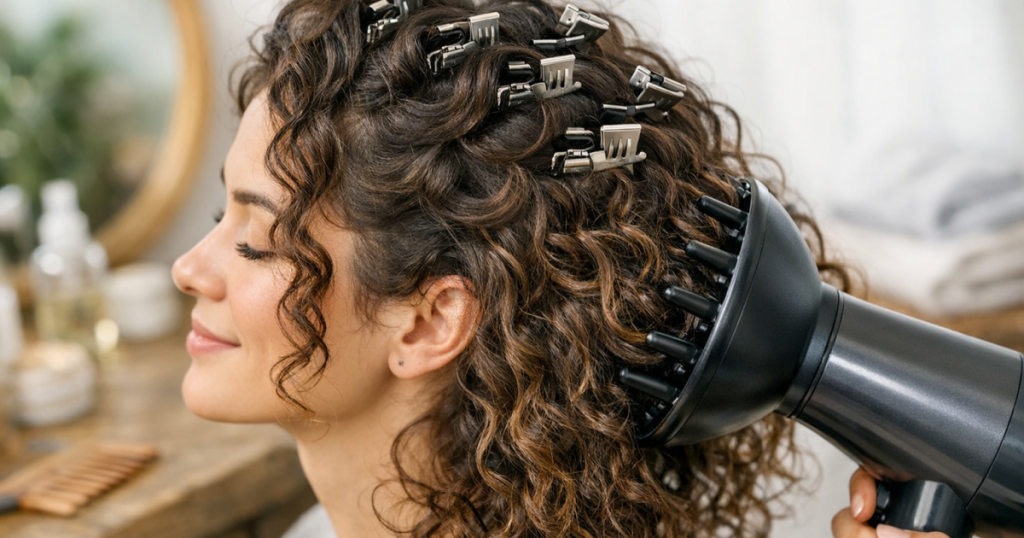
Flat roots can make an otherwise good curly wash day look triangular, with volume at the sides and little lift on top. The easiest way to root clip curly hair while diffusing is to place small clips at the crown and parting while the roots are damp, then diffuse on low airflow until the cast starts to set.
The aim is not to stretch the curl out or create a stiff quiff. Good root clipping lifts the hair away from the scalp just long enough for the root area to dry in a more upright position.
What to know first
- Use small, lightweight clips rather than heavy sectioning clamps for fine or low-density curls.
- Clip only the root area, not the full curl clump, unless you deliberately want a looser curl pattern at the top.
- Diffuse on low airflow first; strong air can blow the clips sideways and disturb the cast.
- Remove clips only when the roots feel mostly dry, not just when the ends look dry.
- For thick hair, lift smaller sections so the underneath roots do not stay flat and damp.
Choose clips that suit your curl density
The clip matters less than the placement, but the wrong clip can make the technique fiddly. Metal duckbill clips are popular because they slide close to the scalp and hold a narrow lift. They work well for fine, wavy and medium-density curls because they do not drag the root down.
If your hair is dense, coarse or very long, a slightly stronger salon-style clip can help, but avoid anything so heavy that it collapses the section. Mini claw clips can work for short curls around the crown, although they can leave a more obvious kink if clamped too tightly.
Start with cleanly detangled hair. If your curls are breakage-prone, work slowly while hair is wet and slippery rather than tugging through knots at the root. For a careful detangling routine before styling, the Tangle Teezer Original review for wet, breakage-prone hair is a useful next read.
Step-by-step: clipping before you diffuse
1. Apply styling product before the clips
Apply your leave-in, curl cream, mousse or gel before clipping. Root clipping works best when the curl has enough hold to set, so if your roots collapse easily, a light mousse or gel near the crown can help. Keep heavy creams and oils away from the top few centimetres if your hair is fine, as they can weigh the roots down before the diffuser has done anything.
2. Decide where you actually need lift
Most people do not need clips everywhere. Focus on the crown, the top of the head, the parting, and any area that dries flat against the scalp. If you clip too many areas at once, the hair can dry into an uneven shape and become harder to fluff naturally.
Use your fingers or the tail of a comb to lift a small section, roughly 1–2 cm wide at the root. For loose waves, keep the section narrow. For dense curls, you can take a slightly thicker section, but the clip should still hold the root rather than pinning a whole curl family together.
3. Insert the clip at the root, not through the curl ends
Lift the root gently upwards, then slide the clip in close to the scalp so it supports the hair in a raised position. The clip should sit parallel to the scalp or slightly angled away from the parting. Avoid clamping the clip across the curl clump halfway down the strand; that can create dents and make the top layer look stretched.
If you wear a side parting, place clips on both sides of the part rather than only on the flatter side. This gives the finished shape balance and stops one side looking lifted while the other sits flat.
4. Add extra support at the crown
The crown is where many curls separate, flatten or form a gap. For this area, lift small sections upwards and clip them so the hair stands slightly away from the scalp. If you have a visible crown split, place clips on either side of the split rather than directly over it. This encourages the hair to dry over the gap more softly.
For very thick hair, it helps to divide the top layer before styling so you can reach the roots properly. The technique is similar to creating clean styling zones for waves; the guide on how to section thick hair for even heatless waves has useful principles you can adapt for curly diffusing.
How to diffuse with the clips in
Start with the diffuser at the roots rather than the ends if root volume is the priority. Use low airflow and low to medium heat, depending on what your hair tolerates. Hold the diffuser near the clipped root area for short bursts, then move to another section. Keeping the dryer still for too long can make the roots feel hot and uncomfortable, so work in passes.
Once the roots start to firm up, diffuse the lengths as normal. Cup the ends gently in the diffuser bowl if your curls like scrunching, or hover diffuse if your pattern frizzes easily. The clips should stay in place while the cast begins to set, but they should not pull, pinch or feel tight at the scalp.
If your diffuser has a strong airflow even on its lowest setting, hover it a little farther away before moving in. This is especially important for loose waves and fine curls, which can be blown out of formation quickly. For travel dryers and compact attachments, check how much airflow control you really have; whether a travel diffuser is enough for curly hair abroad depends heavily on your curl pattern and patience with drying time.
When to remove the clips
Remove the clips when the root area feels mostly dry and supported. If the ends are dry but the roots are still cool or damp, leave the clips in longer and keep hover diffusing. Damp roots will usually fall flat within minutes, even if the rest of the curl looks finished.
To remove a clip, open it fully and slide it out in the direction it went in. Do not pull it straight upwards through the curl. If a clip catches, hold the root with your other hand and release the hair slowly. Once all clips are out, let the hair cool for a few minutes before fluffing.
Finish by placing your fingertips at the scalp and gently shaking the roots. Keep your hands away from the lengths until the cast has fully dried if you want definition. If you prefer bigger, softer curls, scrunch out the cast after the hair is completely dry.
Adjust the technique for your curl type
Fine waves and loose curls
Use fewer clips and lighter styling products. Too many clips can make the roots look piecey, and heavy hold can leave the top stiff. Clip the parting and crown only, then diffuse gently until the roots feel dry enough to hold their shape.
Medium-density curls
This hair type usually gets the most obvious benefit from root clipping. Use 4–8 clips around the crown and parting, depending on your haircut. If your layers are long, lift smaller sections so the clips do not drag the top layer away from the curl pattern underneath.
Thick, dense or coarse curls
Root clipping can work, but it needs smaller zones and more drying time. Lift the top layer in sections, clip close to the scalp, and make sure the underneath roots are not left wet. You may need stronger clips, but avoid heavy clamps that pull the hair down.
Coily or tight curl patterns
Focus on gentle lift rather than forcing height. Clip only where the roots naturally compress, and avoid breaking apart defined coils at the scalp. Hover diffusing is often smoother than pushing the hair into the diffuser bowl too early.
Short curly hair
Use mini clips and target the crown, fringe and parting. On short curls, even a small dent is more visible, so keep the clip close to the root and remove it carefully once dry.
Common mistakes that flatten the result
- Clipping hair that is too wet: Soaking roots can be heavy. Blot gently first if water is dripping from the crown.
- Using clips that are too large: Big clips can squash the curl pattern and create obvious marks.
- Diffusing on high airflow: Fast air can cause frizz before the cast forms.
- Removing clips too early: The roots need to be mostly dry before they can hold lift.
- Touching the lengths too much: Keep your hands at the scalp when fluffing so you do not rough up the curl surface.
Common questions
Can you root clip curly hair after diffusing?
You can, but the lift is usually weaker. Clips work best while the roots are damp enough to set into a lifted shape. If your hair is already dry, use clips for a short refresh with a light mist of water or curl spray at the roots.
Will clips leave dents in curly hair?
They can if they are too tight, too heavy or placed across the curl clump. Use lightweight clips, position them close to the scalp, and remove them by opening the clip fully before sliding it out.
Should I clip before or after applying gel?
Apply gel first, then clip. Gel helps the lifted root area set while you diffuse. If you apply gel after clipping, you may disturb the placement and create frizz around the parting.
How many clips do I need?
Most people need around 4–8 clips for the crown and parting. Fine hair may need fewer, while dense curls may need more carefully placed clips in smaller sections.
Can root clipping replace a volumising haircut?
No. It can improve lift on wash day, but it cannot remove weight from long or one-length hair. If your curls always collapse at the top, layers may make styling easier.
Why it matters
Root clipping is a small technique, but it changes how curly hair dries at the scalp. Instead of relying on upside-down diffusing or aggressive fluffing after the fact, you support the root shape while the curl cast forms. That makes the finish more controlled, with better lift and less frizz.
The most reliable routine is simple: apply hold, clip only the areas that flatten, diffuse gently, wait until the roots are mostly dry, then remove the clips without dragging through the curls. Once you know where your hair collapses, the whole process adds only a few minutes to wash day and can make diffused curls look noticeably more balanced.